WHMCS Module
Install latest module
1. Make sure you have the latest version of MediaCP
2. Download the latest version of the MediaCP module for WHMCS
3. Extract the .zip file to your desktop
4. Connect to your WHMCS server via FTP and navigate to [WHMCS]/modules/servers
5. Drag and drop the mediacp folder from your desktop to your FTP client in order to upload the files.
6. You should now see the mediacp folder inside of your [WHMCS]/modules/servers path on the ftp server
Adding a server in WHMCS
- Login to WHMCS as an administrator and navigate to System Settings.

- Select Products & Services from the left menu then select Servers option.

- Select the + Add New Server button from the top of the page and fill out the form.
- Select Go to Advanced Mode
- Fill out the form according to the details below:
- Name – Enter a label for this server.
- Hostname – Enter the primary domain or subdomain name that MediaCP is installed on such as streaming.myserver.com
- IP Address – enter the IP address of the MediaCP server, this will be used by WHMCS to validate access to the ports.
- Server Status Address – This is used to provide network status and load to WHMCS. MediaCP provides a special URL for you to paste into the WHMCS Server configuration. To display Online status in WHMCS you should first ensure that MediaCP Port 80 is enabled.The format of the WHMCS Status Address is described below, replacing yourdomain.com:2020 with the MediaCP hostname and port and {api-key} with your MediaCP API Key.
https://yourdomain.com:2020/whmcs-status/{api-key}/Example:
https://demo.mediacp.net/whmcs-status/iMtTpHvVWMjMh8dZgn6n0Vqoq3aWyomKmp-KjMV9W5uY06eepH2Mxg==/
- Module – Media Control Panel
- Username – Administrator username, defaults to “admin”
- Password – This field is not used.
- Access Hash – Provide the MediaCP API Key into this field.
- Secure – Check this box if HTTPS/SSL is configured with MediaCP (default ON).
- Port – The primary port that MediaCP software uses. Default is 2020. Change only if you have configured an alternate port for MediaCP Web.
- Name Servers – this information is not required by the MediaCP module.
- Press on the Save Changes button to finish.
Creating your first product
You are now ready to create and configure your first product for the MediaCP.
1. Navigate to Setup -> Products/Services. Then, click Create a new Product.
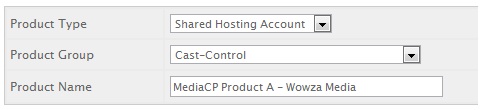
2. Select Shared Hosting Account and select a suitable product group and name and click Continue.
3. Select Module Settings tab and fill out base settings as preferred.
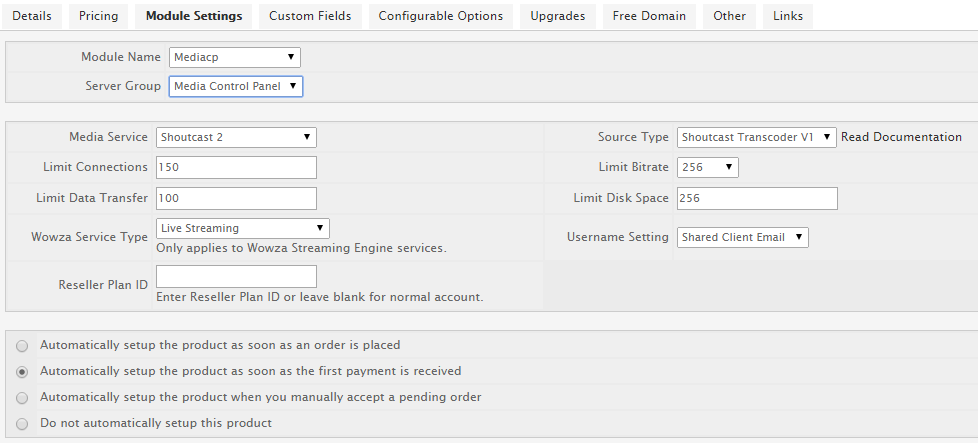
4. Press Save Changes
Additional
Configurable Options
You can let your customers build their own packages by setting Configurable Options.
- Navigate to Setup->Products/Services -> Configurable Options.
- Press Create a New Group
- Configure the Group Name and Assigned Products then press Add New Configurable Option.
- Refer to the table below to build your package options. It is important that the options are labelled correctly, you can choose to use either the Configurable Option or Alternatives for the Option names.
| Configurable Option | Alternatives | Options | Description |
| Media Service | – | Shoutcast Shoutcast 2 Shoutcast 198 Icecast Icecast 2 Icecast 2 KH Icecast KH Wowza Streaming Engine Flash Media Service Windows Media Services | |
| Source | AutoDJ | Shoutcast Transcoder V1 Shoutcast Transcoder V2 Ices 0.4 (MP3) Ices 2.0 (OGG) Stream Transcoder V3 | Alternatively, you can set this value to “Yes” and the module will automatically configure Shoutcast Transcoder V2. |
| Mountpoints | Numerical Value | Number of mountpoints that the Shoutcast or Icecast service will include. Should be an integer. | |
| AutoDJ Sources | Numerical Value | Number of AutoDJ sources that can be applied to mountpoints on Shoutcast and Icecast services. Should be an integer. | |
| Stream Proxy | Stream Proxy | Yes No | Enable or disable the HTTP/HTTPS stream proxy on the account |
| Geo Locking | Geolock Country Locking | Yes No | Allow or disallow geo country locking support on service |
| Source Reencode | AutoDJ Reencode | Yes No | ICES 0.4 ONLY |
| Connections | Listeners Viewers Maximum Users Maximum Listeners Maximum Viewers | Numerical Value | Enter a value between 0 and 9999. |
| Bitrate | Maximum Bitrate | 24, 32, 40, 48, 56, 64, 80, 96, 112, 128, 160, 192, 224, 256, 320, 400, 480, 560, 640, 720, 800, 920, 1024, 1280, 1536, 1792, 2048, 2560, 3072, 3584, 4096, 99999 | Enter only one of the values in the options column. This may also contain “Kbps” at the end of the option value. |
| Disk Usage | Disk Quota Disk Quota | MB, GB or TB | Specify a value including MB, GB or TB. For example: 100MB |
| Data Transfer | Transfer Bandwidth | MB, GB or TB | Specify a value including MB, GB or TB. For example: 100MB |
| Historical Reporting | Reporting Advanced Reporting | Yes / No | Enabled or Disable Historical Reporting capabilities. Standard Usage tab will be displayed in either case. |
| Stream Authentication | Stream Authentication Listener Authentication Stream Auth | Yes / No | Icecast & Icecast KH services ONLY Enables or disables listener stream authentication feature.. |
Stream Publishing Options (Wowza, Flussonic, & Nginx-Rtmp)
| Configurable Option | Alternatives | Options | Description |
| Stream Publishing | Stream Targets | Yes / No | Enables all stream targets |
| Stream Targets | # Stream Targets | Numerical Value | Enter a value between 0 and 9999. |
| Facebook Publishing | Yes / No | ||
| Youtube Publishing | Yes / No | ||
| Periscope Publishing | Yes / No | ||
| Twitch Publishing | Yes / No | ||
| Shoutcast Publishing | Yes / No | ||
| Icecast Publishing | Yes / No | ||
| RTMP Publishing | Yes / No |
Wowza Streaming Engine
| Configurable Option | Alternatives | Options | Description |
| Wowza Media Type | Service Type Flash Media Service | Live Streaming Live Streaming Low Latency TV Station Ondemand Streaming Shoutcast/Icecast Relay Live Camera Restream | |
| Live Authentication | – | Yes No | Wowza Streaming Engine ONLY. |
| nDVR AddOn | nDVR nDVR Playback | Yes No | Wowza Streaming Engine ONLY. |
| Transcoder Profiles | Transcoder Profiles | 160p 240p 360p 480p 576p 720p 1080p 2160p Passthru | Comma delimited list of transcoder profiles. Available with MediaCP 2.6+ For example: 240p 360p,576p 240p,360p,480p 480p,750p,1080p |
| Stream Recording | Live Stream Recording | Yes No | Wowza Streaming Engine ONLY. |
| RTMP | RTMP Support RTMP Service | Yes No | Enable RTMP/RTSP links for Shoutcast & Icecast Services ONLY. |
Flussonic Media Server
| Configurable Option | Alternatives | Options | Description |
| Service Type | Service Type | Live Streaming TV Station Ondemand Streaming | |
| Transcoder Profiles | Transcoder Profiles | 160p 240p 360p 480p 576p 720p 1080p 2160p Passthru | Comma delimited list of transcoder profiles. Available with MediaCP 2.6+ For example: |
| nDVR AddOn | nDVR | Yes / No |
Custom Fields
Custom Fields allow customers to enter specific text values for some configurations.
| Field Name | Field Type | Validation | Description |
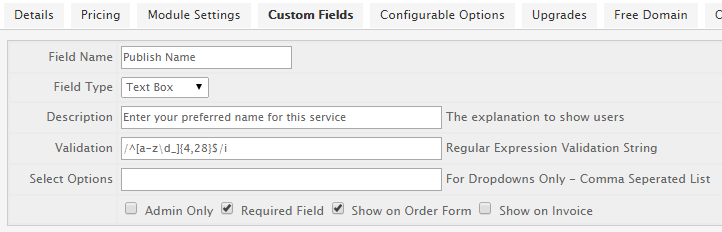
| Publish Name | Text Box | /^[a-zd_]{4,28}$/i | Available for all Media Service Types. Customer can specify desired Publish Name. If not available, the name will automatically be updated. Check the Required Field and Show on Order Form. |
| Shoutcast URL | Text Box | – | WOWZA SERVICES ONLY. Customer can specify their Shoutcast Restream URL or IPCAM Restream URL. Alternate field names can be: Icecast URL Restream Address IPCAM URL IPCAM Address |
| Wowza VHost | Drop Down | – | WOWZA SERVICES ONLY. Admin Only. Required Field. Format: VHOST:IP:RTMP_PORT: Example: _defaultVHost_:110.110.110.1:1935 |
Allow customer to specify publish name
You can allow you customer to specify their preferred Publish Name by following these steps.
- Navigate to Setup->Products/Services. Then select an existing MediaCP product.
- Select the Custom Fields tab and Add New Custom Field with the following settings.
- Field Name -> Publish Name
- Field Type -> Text Box
- Validation: /^[a-zd_]{4,28}$/i
- Check Required Field
- Check Show on Order Form
Email Templates
Audio Streaming (Shoutcast / Icecast)
You can use the following email templates for various services.
SHOUTCAST / ICECAST SERVICES
PLEASE READ THIS EMAIL IN FULL AND PRINT IT FOR YOUR RECORDS
Dear {$client_name},
Thank you for your order from us!
Your Shoutcast service has now been created and this email contains all the information you will need in order to begin using your services.
Hosting Control Panel
Address: https://{$service_server_hostname}:2020/
Username: {$service_username}
Password: {$service_password}
Media Service Information
Service Address: {$mediacp_host_address}
Service Port: {$mediacp_portbase}
Streaming Username: dj
Streaming Password: {$service_password}
Admin Address: http://{$service_domain}/admin
Username: admin
Password: {$service_password}
{foreach from=$service_config_options item=data}{$data.option}: {$data.value}
{/foreach}
How to stream to your new service
1. Download and install Winamp from www.winamp.com
2. Download and install Winamp Shoutcast DSP Plugin from http://shoutcast.com/BroadcastNow
3. Enter your Service IP, Port & Password into the Shoutcast DSP Plugin then press connect.
Thank you for choosing us.
{$signature}
Video Streaming
Please note, this template assumes you have configured the “Publish Name” custom field as the first custom field.
PLEASE READ THIS EMAIL IN FULL AND PRINT IT FOR YOUR RECORDS
Dear {$client_name},
Thank you for your order from us!
Your media service has now been created and this email contains all the information you will need in order to begin using your services.
Hosting Control Panel
Address: https://{$service_server_hostname}:2020/
Username: {$service_username}
Password: {$service_password}
Media Service Information
RTMP: rtmp://{$service_server_hostname}/{$service_custom_fields.0}/{$service_custom_fields.0}
RTSP: rtsp://{$service_server_hostname}/{$service_custom_fields.0}/{$service_custom_fields.0}
{foreach from=$service_config_options item=data}{$data.option}: {$data.value}
{/foreach}
Live Encoder Configuration
Server URL: rtmp://{$service_server_hostname}/{$service_custom_fields.0}
Stream Key: {$service_custom_fields.0}
Username: {$service_custom_fields.0}
Password: {$service_password}
Thank you for choosing us.
{$signature}
Troubleshooting
Request failed – Ensure firewall outgoing port is opened and ensure domain can be resolved.
The most common reason for this error is that your WHMCS server is unable to communicate with the MediaCP due to the outgoing port 2020 being blocked from your WHMCS server. Please review this Knowledgebase article for steps to resolve this WHMCS Request Failed & Transport Error.
Transport error – could not open socket
There is a connection problem between your WHMCS server and the MediaCP. Please review this Knowledgebase article for steps to resolve this WHMCS Request Failed & Transport Error.
Not supported with your version of MediaCP. Please upgrade MediaCP to version 2.9.11, 2.10.7 or newer.
If you are seeing this error when using the Sync button within WHMCS please review this Knowledgebase article for steps to resolve this WHMCS Not supported with your version of MediaCP.
Importing MediaCP accounts into WHMCS
MediaCP 2.9.11 and 2.10.7 introduce the ability to use WHMCS Server Sync tool. Please review this Knowledgebase article for steps to complete this Importing MediaCP accounts into WHMCS.